Version: 2.0

Build a Chatbot with the Chat API

This tutorial guides you through creating a web-based chatbot application using Vectara’s /v2/chats API. In this example, a fictional manufacturing company has a corpus with onboarding data, answering employee questions grounded in factual content from uploaded documents. This data includes safety protocols and equipment manuals. This example may provide inspiration for your specific use case.

What you will build

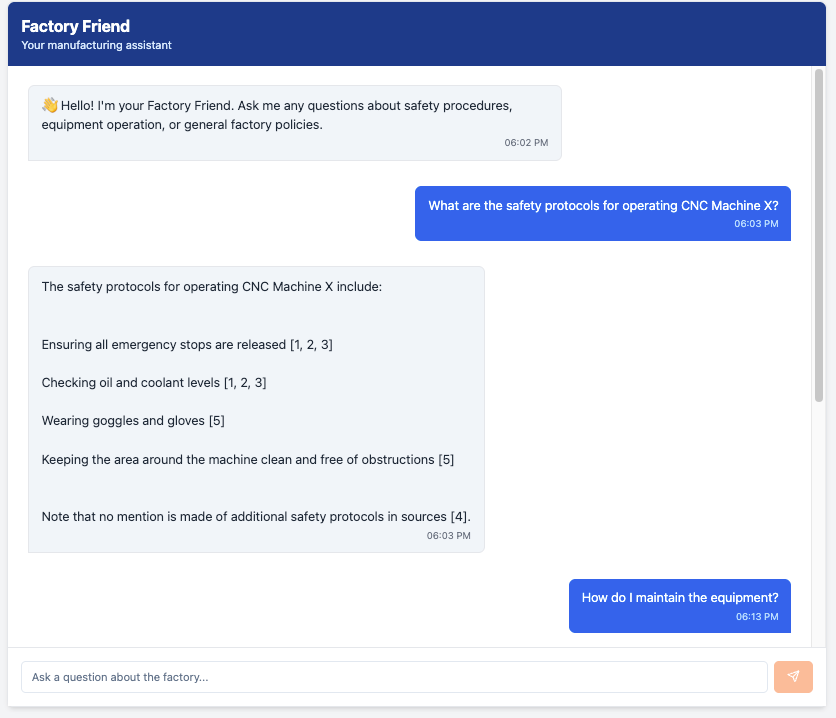
A single-page web app with a clean chat interface, powered by React for the frontend and Vectara’s Chat API for backend query processing. It provides beginner-friendly answers in Markdown format with numbered lists and clickable links. The application has the following features:

  • Accepts user input: Users type questions in a text field.
  • Queries Vectara: Sends questions to the /v2/chats API, using metadata filters to target relevant documents.
  • Displays responses: Shows answers in a chat format with numbered lists and Markdown links (for example, Source).
  • Maintains conversation: Tracks chat sessions for follow-up questions.

After you complete the tutorial, the chatbot will look like this example:

Chatbot example

Prerequisites

Before starting this tutorial, ensure you have the following:

  • Basic knowledge of React and TypeScript
  • Vectara account: Sign up and get an API key with serving permissions, or use your Personal API key.
  • Corpus: Create a corpus like (acme_onboarding) and upload documents with manufacturing information.
    If you do not have this information available, use LLMs to generate data for testing purposes. You can also set metadata fields for each document like safety_category, equipment, process, and document_type.
  • Install the latest releases of Node.js and npm

Chatbot build overview

Follow this process to create the chatbot.

  1. Set up your Vectara corpus.
  2. Create a new React project.
  3. Install required dependencies.
  4. Configure the Tailwind CSS file.
  5. Create the project file structure.
  6. Create the core chatbot files.
  7. Create a basic CSS file to style the application.
  8. Update the configuration and run the development server.
  9. Test your chatbot.

Step 1. Set Up Your Vectara Corpus

To use the chatbot, you need a Vectara corpus with relevant documents. Follow these steps:

  1. Log in to the Vectara Console.
  2. Create a new corpus named acme_onboarding.
  3. Upload documents (such as PDFs or text files) containing safety protocols and equipment manuals.
  4. Add metadata fields during upload or via the API, such as:
    {
    "document_id": "cnc_manual_001",
    "equipment": "CNC_Machine_X",
    "document_type": "equipment_manual",
    "safety_category": "operation",
    "process": "machining"
    }

Step 2. Create a new React project with Vite

npm create vite@latest factory-friend -- --template react-ts
cd factory-friend
npm install

Step 3. Install required dependencies

npm install react-router-dom @tanstack/react-query react-markdown uuid lucide-react clsx tailwind-merge remark-gfm
npm install -D tailwindcss postcss autoprefixer
npx tailwindcss init -p

Step 4. Configure Tailwind CSS

  1. Create tailwind.config.js
    /** @type {import('tailwindcss').Config} */
    module.exports = {
    content: ["./src/**/*.{js,jsx,ts,tsx}"],
    theme: {
    extend: {},
    },
    plugins: [],
    };
  2. Update src/index.css to include Tailwind directives:
    @tailwind base;
    @tailwind components;
    @tailwind utilities;

    @import url('https://fonts.googleapis.com/css2?family=Inter:wght@400;500;600;700&display=swap');

    :root {
    font-family: Inter, system-ui, sans-serif;
    }

    * {
    box-sizing: border-box;
    margin: 0;
    padding: 0;
    }

    body {
    background-color: #f3f4f6;
    }

    button {
    cursor: pointer;
    }

    button:disabled {
    cursor: not-allowed;
    opacity: 0.7;
    }

Step 5. Create the file structure

Create the following files and directories:

factory-friend/
├── src/
│ ├── components/
│ │ ├── ApiKeyForm.tsx
│ │ ├── ChatContainer.tsx
│ │ ├── ChatInput.tsx
│ │ ├── ChatMessage.tsx
│ ├── lib/
│ │ ├── utils.ts
│ ├── pages/
│ │ ├── Index.tsx
│ │ ├── NotFound.tsx
│ ├── services/
│ │ ├── vectara/
│ │ │ ├── api.ts
│ │ │ ├── config.ts
│ │ │ ├── types.ts
│ │ │ ├── utils.ts
│ │ ├── vectaraApi.ts
│ ├── App.tsx
│ ├── main.tsx

Step 6. Create the core files that you need for this chatbot

In this step, you create the essential files for the chatbot, including utilities, API services, React components, pages, and the main application. Let's go through each file with its purpose and code.

Set up types and interfaces

src/lib/utils.ts

Contains helper functions, including the cn function that combines Tailwind CSS classes using the clsx and tailwind-merge libraries for handling conditional class application throughout the application.

export function cn(...classes: string[]) {
return classes.filter(Boolean).join(' ');
}

Configure interfaces

src/services/vectara/types.ts

Defines TypeScript interfaces for the Vectara API request (VectaraRequestBody), response (VectaraResponse), and configuration (VectaraConfig), ensuring type safety for API interactions.

export interface VectaraRequestBody {
query: string;
search: {
corpora: Array<{
corpus_key: string;
metadata_filter?: string;
lexical_interpolation?: number;
}>;
limit?: number;
context_configuration?: {
sentences_before: number;
sentences_after: number;
start_tag?: string;
end_tag?: string;
};
reranker?: {
type: string;
reranker_id: string;
};
};
generation?: {
max_used_search_results?: number;
response_language?: string;
generation_preset_name?: string;
model_parameters?: {
llm_name?: string;
};
enable_factual_consistency_score?: boolean;
};
stream_response?: boolean;
chat?: {
store?: boolean;
};
}

export interface VectaraResponse {
chat_id?: string;
turn_id?: string;
answer: string;
factual_consistency_score?: number;
search_results?: {
text: string;
score: number;
document_id?: string;
}[];
}

export interface VectaraConfig {
apiKey: string;
corpusKey: string;
}

Configure API settings

src/services/vectara/config.ts

Manages configuration settings for the Vectara API, including default values and chat session management. It provides functions to track the chat state as users interact with the application.

import { VectaraConfig } from './types';

// Default config values - replace with your own API key
export const DEFAULT_CONFIG: VectaraConfig = {
apiKey: '', // Will be provided by user
corpusKey: 'your_corpus_key'
};

// Store the current chat ID
let _currentChatId: string | null = null;

export const getCurrentChatId = (): string | null => {
return _currentChatId;
};

export const setCurrentChatId = (chatId: string | null): void => {
_currentChatId = chatId;
console.log('Chat ID updated:', chatId);
};

export const resetChatSession = (): void => {
_currentChatId = null;
console.log('Chat session reset.');
};

Create API utilities

src/services/vectara/utils.ts

Contains helper functions that enhance the Vectara API integration, including metadata filtering based on query content and consistent error handling to improve the user experience.

export const generateMetadataFilter = (question: string): string => {
const lowerQuestion = question.toLowerCase();
if (lowerQuestion.includes('machine') || lowerQuestion.includes('equipment')) {
return "doc.equipment = 'CNC_Machine_X'";
} else if (lowerQuestion.includes('safety') || lowerQuestion.includes('protection')) {
return "doc.document_type = 'safety_protocol'";
} else if (lowerQuestion.includes('onboarding') || lowerQuestion.includes('new employee')) {
return "doc.document_type = 'onboarding_guide'";
} else if (lowerQuestion.includes('machining')) {
return "doc.process = 'machining'";
}
return '';
};

export const handleApiError = (error: Error): string => {
console.error('Error querying Vectara:', error);
if (error.message.includes('401')) {
return '⚠️ Invalid API key. Please verify your Vectara API key and try again.';
} else if (error.message.includes('429')) {
return '⚠️ Rate limit exceeded. Please wait and try again later.';
}
return `⚠️ Error: ${error.message}`;
};

Customization options

  • Metadata filters: Modify the generateMetadataFilter function in
  • src/services/vectara/utils.ts to match your corpus’s metadata fields. For
  • example, add filters for document_type or process to narrow searches:
    if (lowerQuestion.includes('onboarding')) {
    return "doc.document_type = 'onboarding_guide'";
    }

Use filters to improve response accuracy by targeting specific document subsets, especially in large corpora.

Implement API communication

src/services/vectara/api.ts

Implements communication with Vectara’s /v2/chats and /v2/chats/:chatId/turns endpoints. The queryVectara function starts new chat sessions, while createChatTurn handles follow-up questions, with error handling and fallback logic for failed requests.

import { VectaraRequestBody, VectaraResponse } from './types';
import { DEFAULT_CONFIG, getCurrentChatId, setCurrentChatId } from './config';
import { generateMetadataFilter, handleApiError } from './utils';

export const queryVectara = async (
question: string,
apiKey: string = DEFAULT_CONFIG.apiKey,
corpusKey: string = DEFAULT_CONFIG.corpusKey
): Promise<string> => {
try {
if (!apiKey) {
return "⚠️ No API key configured. Please check the setup.";
}

const url = 'https://api.vectara.io/v2/chats';
const metadataFilter = generateMetadataFilter(question);

const body: VectaraRequestBody = {
query: question,
search: {
corpora: [
{
corpus_key: corpusKey,
...(metadataFilter ? { metadata_filter: metadataFilter } : {}),
lexical_interpolation: 0.01
}
],
limit: 10,
context_configuration: {
sentences_before: 2,
sentences_after: 2,
start_tag: "%START_SNIPPET%",
end_tag: "%END_SNIPPET%"
},
reranker: {
type: "customer_reranker",
reranker_id: "rnk_272725719"
}
},
generation: {
generation_preset_name: "mockingbird-2.0",
max_used_search_results: 5,
response_language: "eng",
model_parameters: {
llm_name: "mockingbird-2.0"
},
enable_factual_consistency_score: true
},
stream_response: false,
chat: {
store: true
}
};

const response = await fetch(url, {
method: 'POST',
headers: {
'Content-Type': 'application/json',
'Authorization': `Bearer ${apiKey}`,
'Accept': 'application/json'
},
body: JSON.stringify(body)
});

if (!response.ok) {
const errorText = await response.text();

// Fallback with simpler request if needed
if (response.status === 400) {
const simpleBody = {
query: question,
search: { corpora: [{ corpus_key: corpusKey }] },
stream_response: false,
chat: { store: true }
};

const retryResponse = await fetch(url, {
method: 'POST',
headers: {
'Content-Type': 'application/json',
'Authorization': `Bearer ${apiKey}`,
'Accept': 'application/json'
},
body: JSON.stringify(simpleBody)
});

if (!retryResponse.ok) {
throw new Error(`API error: ${await retryResponse.text()}`);
}

const retryData: VectaraResponse = await retryResponse.json();

if (retryData.chat_id) {
setCurrentChatId(retryData.chat_id);
}

return retryData.answer || "No answer found.";
}

throw new Error(`API error: ${errorText}`);
}

const data: VectaraResponse = await response.json();

if (data.chat_id) {
setCurrentChatId(data.chat_id);
}

return data.answer || "No answer found.";
} catch (error) {
return handleApiError(error as Error);
}
};

export const createChatTurn = async (
question: string,
apiKey: string = DEFAULT_CONFIG.apiKey,
corpusKey: string = DEFAULT_CONFIG.corpusKey
): Promise<string> => {
const chatId = getCurrentChatId();

if (!chatId) {
return queryVectara(question, apiKey, corpusKey);
}

try {
const url = `https://api.vectara.io/v2/chats/${chatId}/turns`;
const metadataFilter = generateMetadataFilter(question);

const body = {
query: question,
search: {
corpora: [
{
corpus_key: corpusKey,
...(metadataFilter ? { metadata_filter: metadataFilter } : {}),
lexical_interpolation: 0.01
}
],
limit: 10,
context_configuration: {
sentences_before: 2,
sentences_after: 2
}
},
generation: {
max_used_search_results: 5,
response_language: "eng"
},
stream_response: false
};

const response = await fetch(url, {
method: 'POST',
headers: {
'Content-Type': 'application/json',
'Authorization': `Bearer ${apiKey}`,
'Accept': 'application/json'
},
body: JSON.stringify(body)
});

if (!response.ok) {
// Handle chat session expiry
if (response.status === 404) {
setCurrentChatId(null);
return queryVectara(question, apiKey, corpusKey);
}

throw new Error(`API error: ${await response.text()}`);
}

const data: VectaraResponse = await response.json();
return data.answer || "No answer found.";
} catch (error) {
return handleApiError(error as Error);
}
};

Create API facade

Provides a simplified interface to the Vectara services by re-exporting the necessary functions, making them easier to import and use elsewhere in the application.

src/services/vectaraApi.ts

export { queryVectara, createChatTurn } from './vectara/api';
export { resetChatSession, getCurrentChatId, setCurrentChatId } from './vectara/config';

Build the message component

src/components/ChatMessage.tsx

Defines how individual chat messages are displayed, handling both user and assistant messages with appropriate styling and Markdown formatting for rich text responses.

import React from "react";
import ReactMarkdown from "react-markdown";
import remarkGfm from "remark-gfm";

export type MessageRole = "user" | "assistant" | "system";

export interface Message {
id: string;
role: MessageRole;
content: string;
timestamp: Date;
}

interface ChatMessageProps {
message: Message;
}

export function ChatMessage({ message }: ChatMessageProps) {
const isUser = message.role === "user";

return (
<div className={`flex w-full gap-3 p-4 ${isUser ? "justify-end" : "justify-start"}`}>
<div
className={`flex max-w-[80%] flex-col rounded-lg px-4 py-3
${isUser
? "bg-blue-600 text-white rounded-br-none"
: "bg-gray-100 text-gray-800 rounded-bl-none border border-gray-200"}`
}
>
<ReactMarkdown
className="whitespace-pre-wrap"
remarkPlugins={[remarkGfm]}
components={{
a: ({ href, children }) => (
<a
href={href}
className={isUser ? "text-blue-200 underline" : "text-blue-600 underline"}
target="_blank"
rel="noopener noreferrer"
>
{children}
</a>
),
ul: ({ children }) => <ul className="list-disc pl-5">{children}</ul>,
ol: ({ children }) => <ol className="list-decimal pl-5">{children}</ol>,
}}
>
{message.content}
</ReactMarkdown>
<div className={`mt-1 text-right text-xs ${isUser ? "text-blue-200" : "text-gray-500"}`}>
{message.timestamp.toLocaleTimeString([], { hour: "2-digit", minute: "2-digit" })}
</div>
</div>
</div>
);
}

Create the chat input component

src/components/ChatInput.tsx

Provides the chat input field where users type their questions, including form handling and submission to send queries to the Vectara API.

import React, { useState, FormEvent } from "react";

interface ChatInputProps {
onSendMessage: (message: string) => void;
disabled?: boolean;
}

export function ChatInput({ onSendMessage, disabled = false }: ChatInputProps) {
const [message, setMessage] = useState("");

const handleSubmit = (e: FormEvent) => {
e.preventDefault();

const trimmedMessage = message.trim();
if (trimmedMessage && !disabled) {
onSendMessage(trimmedMessage);
setMessage("");
}
};

return (
<form
onSubmit={handleSubmit}
className="flex items-center gap-2 border-t border-gray-200 bg-white p-4 sticky bottom-0 w-full"
>
<input
placeholder="Ask a question about the factory..."
value={message}
onChange={(e) => setMessage(e.target.value)}
disabled={disabled}
className="flex-1 border border-gray-300 rounded px-3 py-2"
/>
<button
type="submit"
disabled={disabled || !message.trim()}
className="bg-orange-500 text-white px-4 py-2 rounded disabled:opacity-50"
>
Send
</button>
</form>
);
}

Build the chat container

src/components/ChatContainer.tsx

Integrates all chat components into a functioning conversation interface, managing the message state, API requests, and auto-scrolling as new messages appear.

import React, { useState, useRef, useEffect } from "react";
import { v4 as uuidv4 } from "uuid";
import { ChatMessage, Message } from "./ChatMessage";
import { ChatInput } from "./ChatInput";
import { queryVectara, createChatTurn, resetChatSession } from "../services/vectaraApi";

export function ChatContainer({ apiKey }: { apiKey: string }) {
const [messages, setMessages] = useState<Message[]>([
{
id: "welcome-message",
role: "assistant",
content: "👋 Hello! I'm your Factory Friend. Ask me any questions about safety procedures, equipment operation, or general factory policies.",
timestamp: new Date(),
},
]);
const [isLoading, setIsLoading] = useState(false);
const messagesEndRef = useRef<HTMLDivElement>(null);

// Auto-scroll to bottom when messages update
useEffect(() => {
messagesEndRef.current?.scrollIntoView({ behavior: "smooth" });
}, [messages]);

// Reset chat session when component unmounts
useEffect(() => {
return () => {
resetChatSession();
};
}, []);

async function handleSendMessage(content: string) {
// Add user message
const userMessage: Message = {
id: uuidv4(),
role: "user",
content,
timestamp: new Date(),
};

setMessages((prev) => [...prev, userMessage]);
setIsLoading(true);

try {
// Get response from Vectara API
const corpusKey = 'your_corpus_key'; // Replace with your corpus key
let response;

// Use messages.length to determine if this is the first message or not
if (messages.length === 1) { // Only welcome message, so this is first user query
response = await queryVectara(content, apiKey, corpusKey);
} else {
response = await createChatTurn(content, apiKey, corpusKey);
}

// Add assistant response
const assistantMessage: Message = {
id: uuidv4(),
role: "assistant",
content: response,
timestamp: new Date(),
};

setMessages((prev) => [...prev, assistantMessage]);
} catch (error) {
console.error("Error getting response:", error);
// Show error message
const errorMessage: Message = {
id: uuidv4(),
role: "assistant",
content: "Sorry, I encountered an error. Please try again.",
timestamp: new Date(),
};
setMessages((prev) => [...prev, errorMessage]);
} finally {
setIsLoading(false);
}
}

return (
<div className="flex flex-col h-[500px] bg-white rounded-lg shadow-md border border-gray-200">
<div className="p-4 bg-blue-600 text-white rounded-t-lg">
<h2 className="text-xl font-bold">Factory Friend</h2>
<p className="text-sm text-blue-100">Your manufacturing assistant</p>
</div>

<div className="flex-1 overflow-y-auto p-2">
{messages.map((message) => (
<ChatMessage key={message.id} message={message} />
))}

{isLoading && (
<div className="flex items-center p-4">
<div className="bg-gray-100 rounded-lg p-3">
<div className="flex items-center gap-2">
<div className="h-2 w-2 bg-blue-600 rounded-full animate-pulse"></div>
<div className="h-2 w-2 bg-blue-600 rounded-full animate-pulse delay-150"></div>
<div className="h-2 w-2 bg-blue-600 rounded-full animate-pulse delay-300"></div>
<span className="text-sm text-gray-500 ml-1">Thinking...</span>
</div>
</div>
</div>
)}

<div ref={messagesEndRef} />
</div>

<ChatInput onSendMessage={handleSendMessage} disabled={isLoading} />
</div>
);
}

Implement the API key form

src/components/ApiKeyForm.tsx

Creates a form for users to input their Vectara API key, storing it in localStorage for persistence across sessions.

import React, { useState } from "react";

interface ApiKeyFormProps {
onApiKeySubmit: (apiKey: string) => void;
}

export function ApiKeyForm({ onApiKeySubmit }: ApiKeyFormProps) {
const [apiKey, setApiKey] = useState("");

const handleSubmit = (e: React.FormEvent) => {
e.preventDefault();

if (apiKey.trim()) {
onApiKeySubmit(apiKey.trim());
}
};

return (
<div className="w-full max-w-md mx-auto bg-white p-6 rounded-lg shadow-md">
<h2 className="text-xl font-bold mb-4">Welcome to Factory Friend</h2>
<p className="text-gray-600 mb-4">
Enter your Vectara API key to connect to your knowledge base.
</p>

<form onSubmit={handleSubmit}>
<div className="mb-4">
<label htmlFor="apiKey" className="block text-sm font-medium text-gray-700 mb-1">
Vectara API Key
</label>
<input
id="apiKey"
type="text"
placeholder="Enter your API key..."
value={apiKey}
onChange={(e) => setApiKey(e.target.value)}
className="w-full border border-gray-300 rounded px-3 py-2"
/>
</div>

<div className="flex justify-end">
<button
type="submit"
className="px-4 py-2 bg-blue-600 text-white rounded"
disabled={!apiKey.trim()}
>
Connect
</button>
</div>
</form>
</div>
);
}

Create the main page

src/pages/Index.tsx

Serves as the main page, conditionally rendering the API key form or chat container based on the stored API key, and managing key persistence in localStorage.

import React, { useState, useEffect } from "react";
import { ChatContainer } from "../components/ChatContainer";
import { ApiKeyForm } from "../components/ApiKeyForm";

// Storage key for the API key
const API_KEY_STORAGE_KEY = "vectara-api-key";

const Index = () => {
const [apiKey, setApiKey] = useState<string | null>(null);
const [isLoading, setIsLoading] = useState(true);

// Check for stored API key on mount
useEffect(() => {
const storedApiKey = localStorage.getItem(API_KEY_STORAGE_KEY);
setApiKey(storedApiKey);
setIsLoading(false);
}, []);

const handleApiKeySubmit = (newApiKey: string) => {
if (newApiKey) {
localStorage.setItem(API_KEY_STORAGE_KEY, newApiKey);
alert("API Key Saved");
setApiKey(newApiKey);
}
};

const resetApiKey = () => {
localStorage.removeItem(API_KEY_STORAGE_KEY);
setApiKey(null);
alert("API Key Removed");
};

if (isLoading) {
return <div className="text-center p-8">Loading...</div>;
}

return (
<div className="min-h-screen bg-gray-100 p-4">
<div className="max-w-3xl mx-auto space-y-6">
<header className="text-center mb-6">
<h1 className="text-3xl font-bold text-blue-600">Factory Friend</h1>
<p className="text-lg text-gray-600 mt-2">
Manufacturing knowledge assistant for new employees
</p>
</header>

{apiKey === null ? (
<ApiKeyForm onApiKeySubmit={handleApiKeySubmit} />
) : (
<div className="space-y-4">
<ChatContainer apiKey={apiKey} />

<div className="text-center">
<button
onClick={resetApiKey}
className="text-sm text-gray-500 hover:text-blue-600 underline"
>
Reset API Key
</button>
</div>
</div>
)}

<footer className="mt-8 text-center text-sm text-gray-500">
<p>
© {new Date().getFullYear()} Factory Friend - An AI assistant for
manufacturing staff
</p>
</footer>
</div>
</div>
);
}

export default Index;

Create a 404 page

src/pages/NotFound.tsx

Displays a 404 error page for invalid routes, with a link to return to the home page.

import React from "react";
import { Link } from "react-router-dom";

const NotFound = () => {
return (
<div className="min-h-screen flex items-center justify-center bg-gray-100">
<div className="text-center">
<h1 className="text-4xl font-bold text-red-500 mb-4">404</h1>
<h2 className="text-2xl font-medium mb-6">Page Not Found</h2>
<p className="text-gray-600 mb-8">
The page you're looking for doesn't exist.
</p>
<Link
to="/"
className="px-4 py-2 bg-blue-600 text-white rounded hover:bg-blue-700"
>
Return to Home
</Link>
</div>
</div>
);
};

export default NotFound;

Create the main application

src/App.tsx

Sets up the application routing and global providers, integrating all components into a complete application structure.

import React from "react";
import { BrowserRouter, Routes, Route } from "react-router-dom";
import Index from "./pages/Index";
import NotFound from "./pages/NotFound";

const App = () => (
<BrowserRouter>
<Routes>
<Route path="/" element={<Index />} />
<Route path="*" element={<NotFound />} />
</Routes>
</BrowserRouter>
);

export default App;

Initialize the application

src/main.tsx

Bootstraps the React application, mounting it to the DOM and enabling it to run in the browser.

import React from 'react';
import ReactDOM from 'react-dom/client';
import App from './App';
import './index.css';

ReactDOM.createRoot(document.getElementById('root')!).render(
<React.StrictMode>
<App />
</React.StrictMode>
);

Step 7. Create a basic CSS file to style the application

src/index.css

Provides global styles for the application, including Tailwind CSS utility classes and custom variables for consistent theming.

@tailwind base;
@tailwind components;
@tailwind utilities;

@import url('https://fonts.googleapis.com/css2?family=Inter:wght@400;500;600;700&display=swap');

:root {
font-family: Inter, system-ui, sans-serif;
}

* {
box-sizing: border-box;
margin: 0;
padding: 0;
}

body {
background-color: #f3f4f6;
}

button {
cursor: pointer;
}

button:disabled {
cursor: not-allowed;
opacity: 0.7;
}

Step 8. Update the configuration and run the development server

  1. Open src/services/vectara/config.ts and replace the placeholder corpus_key with your actual corpus key, such as acme_onboarding:
      export const DEFAULT_CONFIG: VectaraConfig = {
    apiKey: '', // Will be provided by user through the UI
    corpusKey: 'your_corpus_key' // Replace with your actual corpus key
    };
  2. Update the corpus key in src/components/ChatContainer.tsx:
    const corpusKey = 'your_corpus_key'; // Replace with your corpus key
  3. Run the development server: npm run dev

Step 9. Test Your Chatbot

To verify your chatbot works:

  1. Open the app in your browser (http://localhost:5173 after running npm run dev).
  2. Enter your Vectara API key in the form.
  3. Try these sample questions (or similar questions, based on your uploaded data) aligned with the acme_onboarding corpus:
    • "What are the safety protocols for operating CNC Machine X?"
    • "How do I maintain the equipment?"
    • "What is the onboarding process for new employees?"
  4. Check that responses include Markdown formatting (numbered lists, links like [Source](https://support.acme.com)). Example response:

Additional customization options

Consider these updates after completing the tutorial:

  • Metadata filters: Modify the generateMetadataFilter function to match your corpus structure.
  • UI styling: Update the CSS classes to match your company's branding.
  • Welcome message: Customize the initial greeting in ChatContainer.tsx.
  • Error handling: Enhance the error messages and fallback strategies.