Quick Start
Welcome to 's Quick Start tutorial. In just a couple minutes, you'll upload this Vectara Employee Handbook (PDF) and begin exploring our company's unique pet policy. Have you ever wondered if you can bring a velociraptor to work? Why certain birds are allowed for the most random reason? We have part of a unique employee handbook ready for you to upload into a corpus, and we'll guide you through the ingestion and question answering process step by step.
Step 1. Create a Vectara account
To get started with , go to https://console.vectara.com/signup or click Get Started Free at vectara.com. After you make an account, you can create your first corpus and upload your first document!
Step 2. Create your first corpus
Before you can ask the data about bringing your velociraptor to the office, you first need to create a corpus. Think of a corpus as a container that includes your uploaded data, and you really want to extract meaningful information from this data through queries. In this case, we upload a PDF file file that contains the pet policy information. After you upload this file, ingests your data and lets you ask the burning question on everyone's mind!
-
Click Create corpus.
-
Enter a Name and Description such as Vectara Employee Handbook and Pet Policy.
Don't worry about the Filter Attributes for now. You can read about filter expressions and edit them later.
-
Click Create corpus.
The Corpus ID displays next to the corpus title Vectara Employee Handbook in the console. If you use the API later, you need to configure
corpus_idfields with this value.
Step 3. Upload your first document
The hard part is over. Now you can get answers about your uploaded data! Think about the kind of queries that you or other users could ask about the company's pet policies. The main question on everyone's mind is still "Can I bring a velociraptor to the office?"
Now that you created the corpus, you can upload the PDF document that contains the pet policy. When you create additional corpora in the future, the left menu lets you come back to any corpus for data ingestion and search.
-
Download the Vectara Employee Handbook (PDF).
-
Click Employee Handbook from the left menu, if you decided to explore the UI after the previous step.
-
Click the Add Data tab.
We support
.md,.pdf,.doc,.docx,.ppt,.pptx,.txt,.html,.rtf, and.epubfiles. Review supported file types for a full list. -
Select or drag and drop the pet policy document
PDFinto the corpus.
That's it! has just ingested this important document!
Step 4. Get answers from your uploaded content
Let's take a closer look at the employee handbook you just uploaded. Since has now ingested the data, you can ask all sorts of questions and receive meaningful and relevant results.
-
Select the Vectara Employee Handbook from list in the left menu.
-
Click the Query data tab.
-
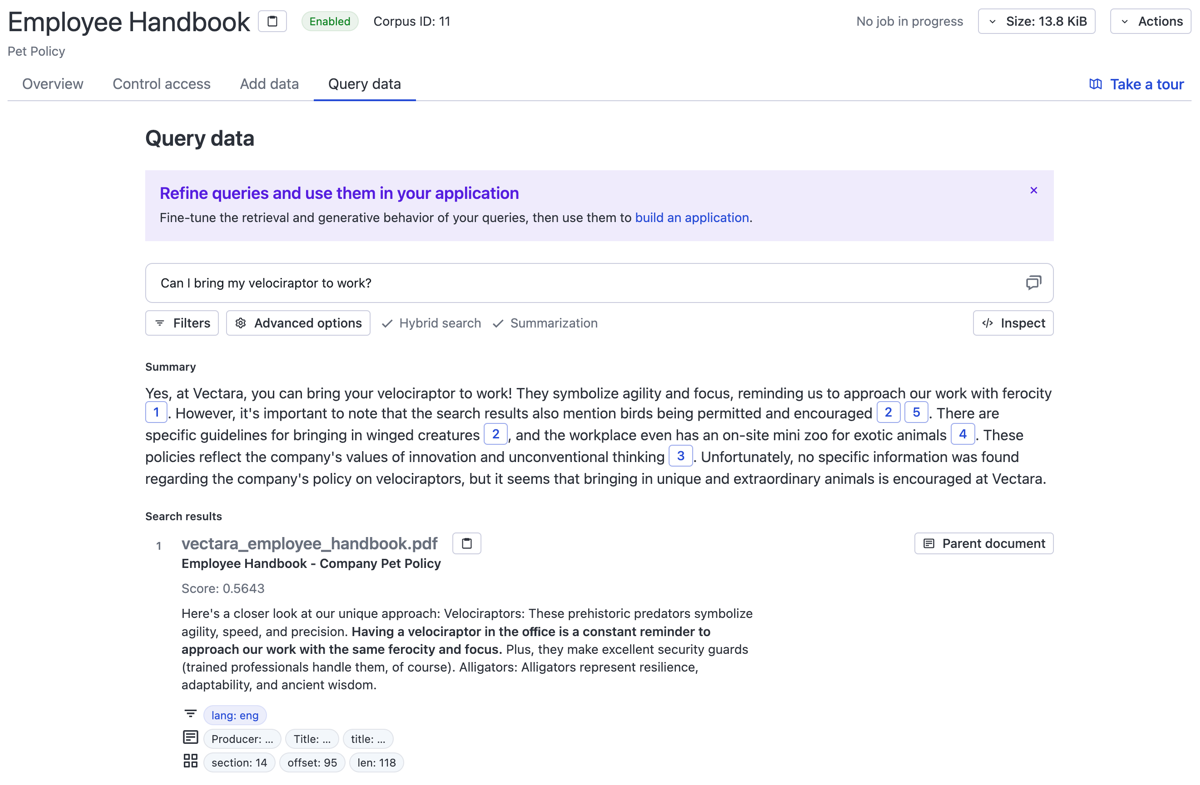
Ask a question and view a summary of the answer along with additional search results.
For example, you ask, "Can I bring a velociraptor to the office?"
-
You get a detailed summary that contains citations from the data.
You also get additional search results that answer your question with additional metadata.

Now you know our policy on bringing velociraptors to the office!
More questions for you to try
Here are more questions that you can copy and paste into the console to learn more about the pet policies:
- How does the company ensure the well-being of alligators in a shared workspace?
- Are there any specific breeds of birds that are prohibited in the office?
- Are there any restrictions on the size or number of bears an employee can bring?
- How does the company handle potential conflicts between different species, such as birds and alligators?
Now you have an understanding of how to upload data into a corpus, ask questions, and get meaningful answers from . Continue gaining more answers and insights from your data, and ingest more data. Imagine the amount of time saved because you get quick answers with precise summaries!
Next steps
If you want to start using our API Recipes, you need
the customer_id value. also sent
you a welcome email with this ID after you created the account.
View your Customer ID
After you create an account, you can click your name in the upper-right corner to view your Customer ID, email, account size, and more. You need the Customer ID for many API requests.

You can click your name in the top, upper-right corner to reveal
the customer_id.